Knowledge Base
How do I ingest data using my managed bucket?
Overview
A dataset defines a container that will hold your data with newly created ones being empty. The next step is to add data to your dataset, a process called "ingestion".
Once data is ingested into your dataset you can use Seller Studio's customizable filters to create, package, and sell different data products on your Data Shop and/or the Data Marketplace.
Using your managed bucket you can easily ingest data in just two steps:
- Upload data to a specific folder inside your managed bucket.
- Trigger an ingestion of your uploaded data.
The process will be explained and then end-to-end examples given using the AWS CLI and the AWS console.
Ingestion Process
- Upload Data
To upload files for a dataset they must be uploaded to a specific folder inside your managed bucket that looks like:
/ingestion/datasets/version=1/datasetId=DATASET_ID/FILE_SET_FOLDER/
Substitute the following values in the folder name:- DATASET_ID: the ID of the dataset you want to update. Your dataset's ID can be found in Dataset Manager after it has been created.
- FILE_SET_FOLDER: each time you upload a new set of files to your dataset you must put them in a new folder. If you are uploading new files every day a good choice for FILE_SET_FOLDER would be the day's date, e.g. set FILE_SET_FOLDER to 2021-09-20 for data being uploaded on September 20th, 2021.
Note:- In the example above, "version=1" refers to Narrative's ingestion protocol version number. Always use "version=1".
- The format and schema of the files you upload must match your dataset file configuration and schema settings. If you provides files in a format such as CSV, or TSV, or any other delimited format, then the order of the fields in the file must match the order of the fields in your dataset's schema.
- Trigger an Ingestion
Once all the data you would like to add to your dataset is in place the next step is instruct Narrative to ingest the data you have uploaded.
The simplest way to do this with your managed bucket is to write a special file called an "ingestion trigger file" to the folder with the data you'd like ingested. An "ingestion trigger" file is simply an empty file with the the name _NIO_COMMIT.
Example
Suppose you have uploaded all the data you would like to be ingested for a particular DATASET_ID and FILE_SET_FOLDER (these concepts are explained in the previous section). The contents of your folder are as follows:
/ingestion/datasets/version=1/datasetId=DATASET_ID/FILE_SET_FOLDER/file1.csv
/ingestion/datasets/version=1/datasetId=DATASET_ID/FILE_SET_FOLDER/file2.csv
To trigger an ingestion of file1.csv and file2.csv you would write an ingestion trigger file to FILE_SET_FOLDER so that the updated folder contents are:
/ingestion/datasets/version=1/datasetId=DATASET_ID/FILE_SET_FOLDER/_NIO_COMMIT
/ingestion/datasets/version=1/datasetId=DATASET_ID/FILE_SET_FOLDER/file1.csv
/ingestion/datasets/version=1/datasetId=DATASET_ID/FILE_SET_FOLDER/file2.csv
Once the ingestion trigger file has been written Narrative's systems will begin ingesting file1.csv and file2.csv.
Important Notes
- The ingestion trigger file must be uploaded as the final step after all other files have been uploaded.
- The folder to which the ingestion trigger file is uploaded and all its subfolders will be ingested.
- For example, if your folder contains the following:
/ingestion/datasets/version=1/datasetId=DATASET_ID/FILE_SET_FOLDER/file.csv
/ingestion/datasets/version=1/datasetId=DATASET_ID/FILE_SET_FOLDER/subdirectory-1/file.csv
/ingestion/datasets/version=1/datasetId=DATASET_ID/FILE_SET_FOLDER/subdirectory-2/file.csv - Then writing an ingestion trigger file to /ingestion/datasets/version=1/datasetId=DATASET_ID/FILE_SET_FOLDER/ will result in all of file.csv, subdirectory-1/file.csv , and subdirectory-2/file.csv being ingested.
- For example, if your folder contains the following:
- Changing files in a FILE_SET_FOLDER after you have triggered an ingestion is not supported and can result in none of the intended data being ingested into your dataset. However, before triggering an ingestion you can edit files inside a FILE_SET_FOLDER as much as you'd like.
- Uploaded files will disappear from your bucket after they have been ingested.
- If you reuse a FILE_SET_FOLDER within 24 hours your files will be ignored. This policy is in place to prevent duplicate ingestions in case the ingestion trigger file is accidentally written multiple times.
- Files written to /ingestion/datasets/version=1/datasetId=DATASET_ID/ will be ignored, all ingestions must be triggered from a specific FILE_SET_FOLDER inside /ingestion/datasets/version=1/datasetId=DATASET_ID/.
Keep in mind that depending on the file configuration used to create a dataset, each new ingestion action will either append new data to the dataset or overwrite the entire dataset with new data.
Example Ingestion
The examples below work through the task of updating a dataset with the contents of a file using different tools.
For the purposes of the examples the the following is assumed:
- The dataset ID is 123456789.
- The file to be ingested is called example.csv.
- The managed bucket name is nio-example-t2pxc2uync7h .
Example: Using the AWS CLI
In the example below it is assumed that the profile configured to access the managed bucket is called nio-example.
Upload Data
Start by uploading the example.csv to a fresh FILE_SET_FOLDER.
In the example below we've chosen 2021-09-20 as our FILE_SET_FOLDER.
aws s3 cp \
--profile nio-example \
tunadata.csv \
s3://nio-example-t2pxc2uync7h/ingestion/datasets/version=1/datasetId=123456789/2021-09-20/
--acl bucket-owner-full-control
Warning: If you are using "bucket policy access" you MUST use the Access Control List "bucket-owner-full-control" per above:
--acl bucket-owner-full-control
Any attempt to write data without doing so will result in an "access denied" error.
You can confirm the file is in place by running aws s3 ls:
aws s3 ls \
--profile nio-example \
s3://nio-example-t2pxc2uync7h/ingestion/datasets/version=1/datasetId=123456789/2021-09-20/
Trigger an Ingestion
First create an empty file called _NIO_COMMIT to serve as the ingestion trigger file. This process is different on different operating systems. The below works on OS X and most Unix-like operation systems.
touch _NIO_COMMIT
For your convenience you can click here to download an empty file called _NIO_COMMIT.
Then upload the trigger file to FILE_SET_FOLDER:
aws s3 cp \
--profile nio-example \
_NIO_COMMIT \
s3://nio-example-t2pxc2uync7h/ingestion/datasets/version=1/datasetId=123456789/2021-09-20/
Example: Using the AWS Console
Start by assuming your bucket access role in the console and navigating to your bucket-specific console access URL.
As a reminder, your console bucket access URL looks like:
https://s3.console.aws.amazon.com/s3/buckets/BUCKET\_NAME/
Where BUCKET_NAME is the name of your managed bucket. For this example the console access URL would be https://s3.console.aws.amazon.com/s3/buckets/nio-example-t2pxc2uync7h/ as our bucket name is "nio-example-t2pxc2uync7h".
Upload Data
Create the appropriate ingestion folder for your dataset in your bucket: /ingestion/datasets/version=1/datasetId=123456789. See the official AWS guide for creating a folder: https://docs.aws.amazon.com/AmazonS3/latest/userguide/using-folders.html#create-folder.
Note that each subfolder will have be created one at a time: you'll first have to create the ingestion folder, then create the datasets folder inside the ingestion folder, and so on.
Next create a new file set folder for the data to be ingested. In this example we'll call the folder 2021-09-20 — using the upload date is a convenient choice. The results of creating the folder are below:
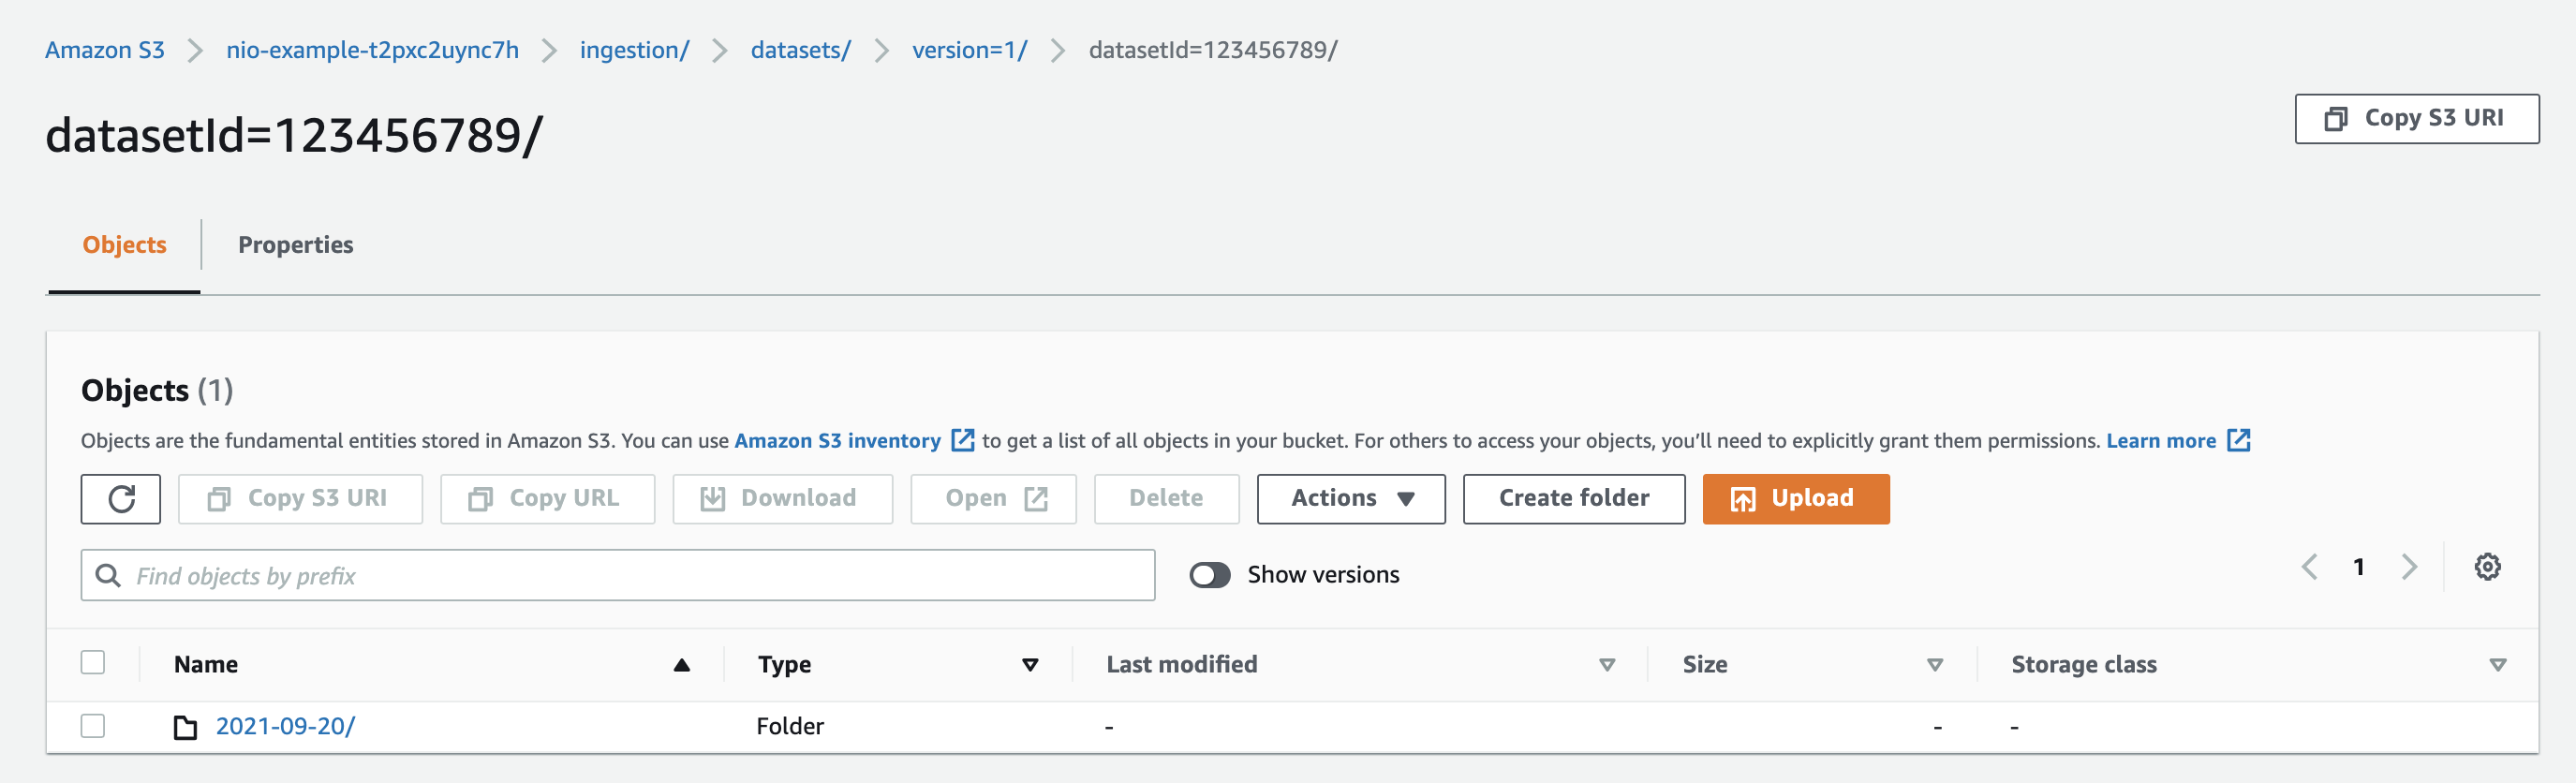
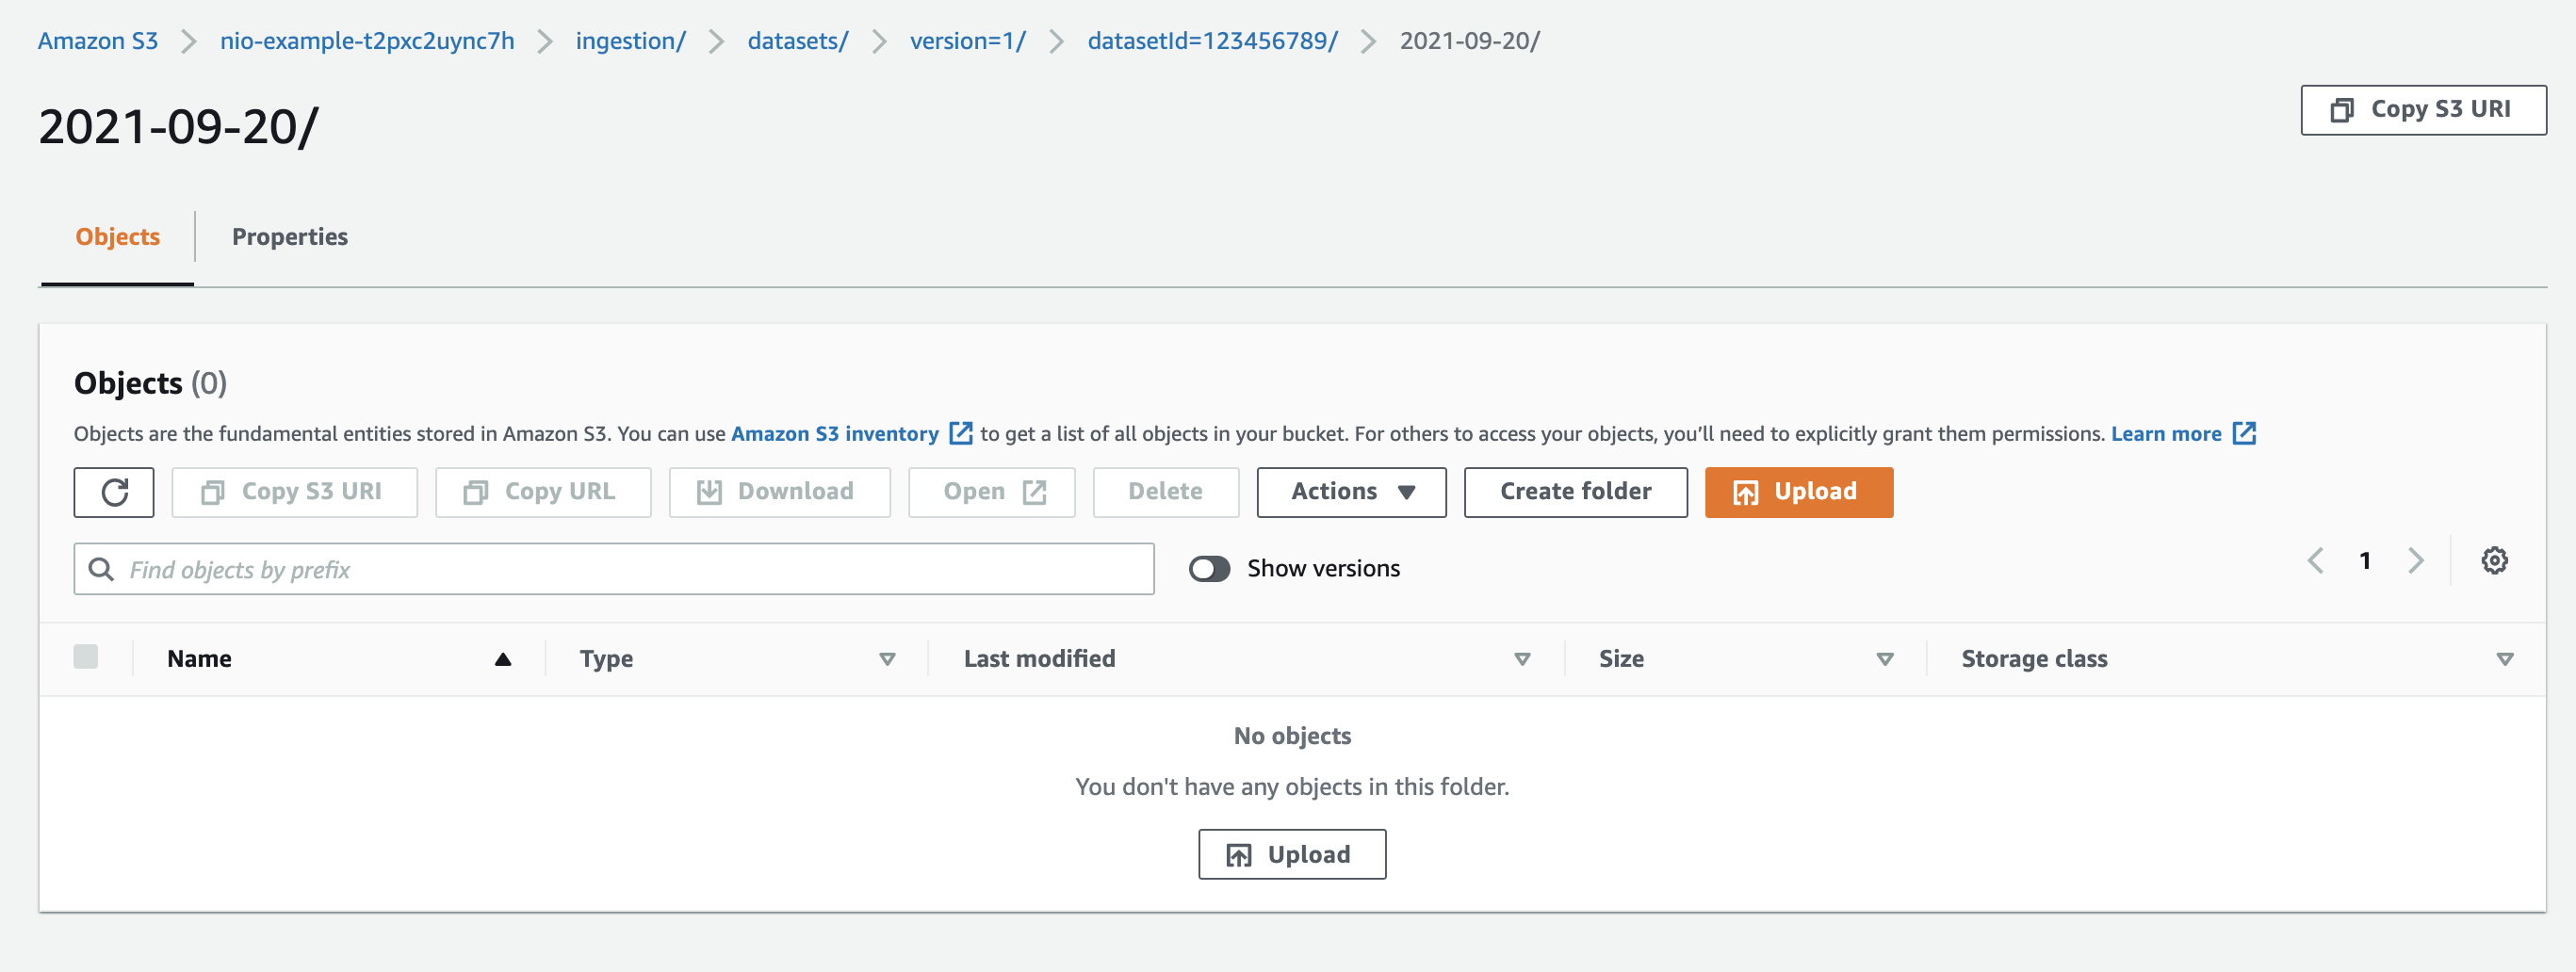
Click on the newly created folder. It will be empty:
Click Upload and then Add Files. Select the file you'd like to upload in the file navigation window that appears.
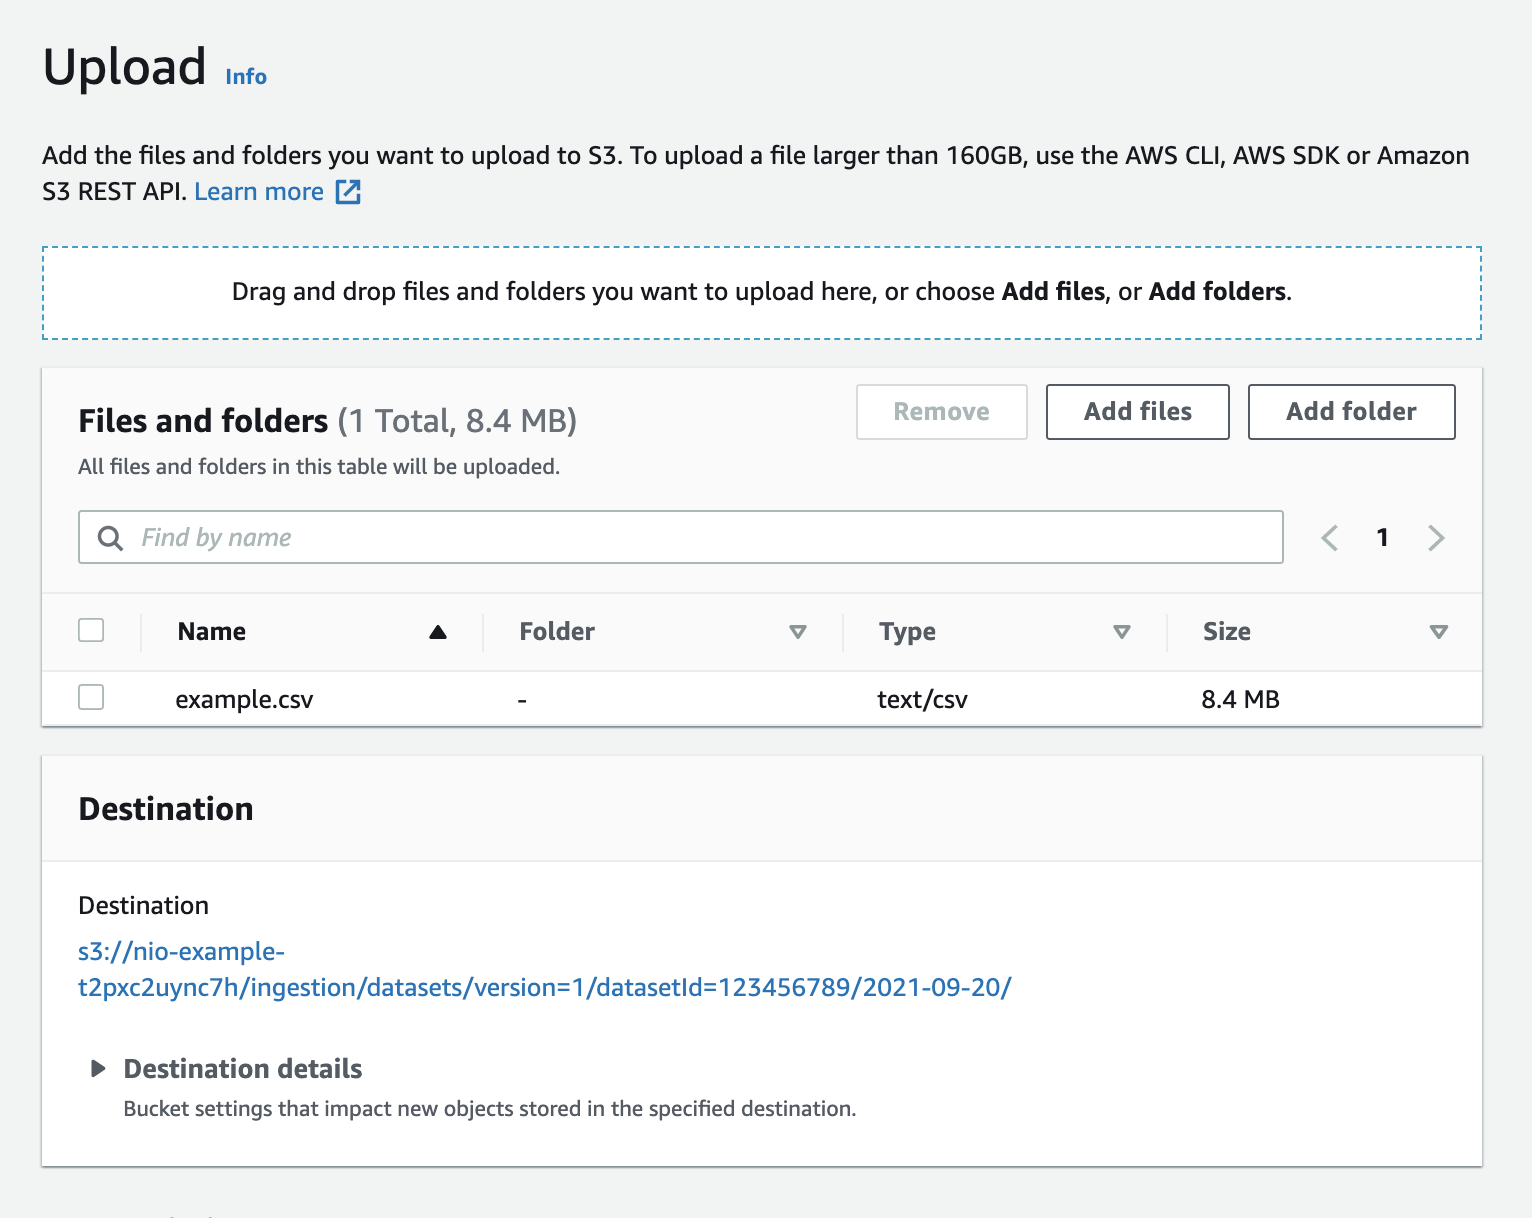
Scroll to the bottom of the page and click Upload. Do not modify other settings on the page, simply use the provided defaults.
The folder will now contain the uploaded file:

Note that no ingestion trigger file has been uploaded yet. The ingestion trigger file must always come after successful upload of all data files.
Trigger an Ingestion
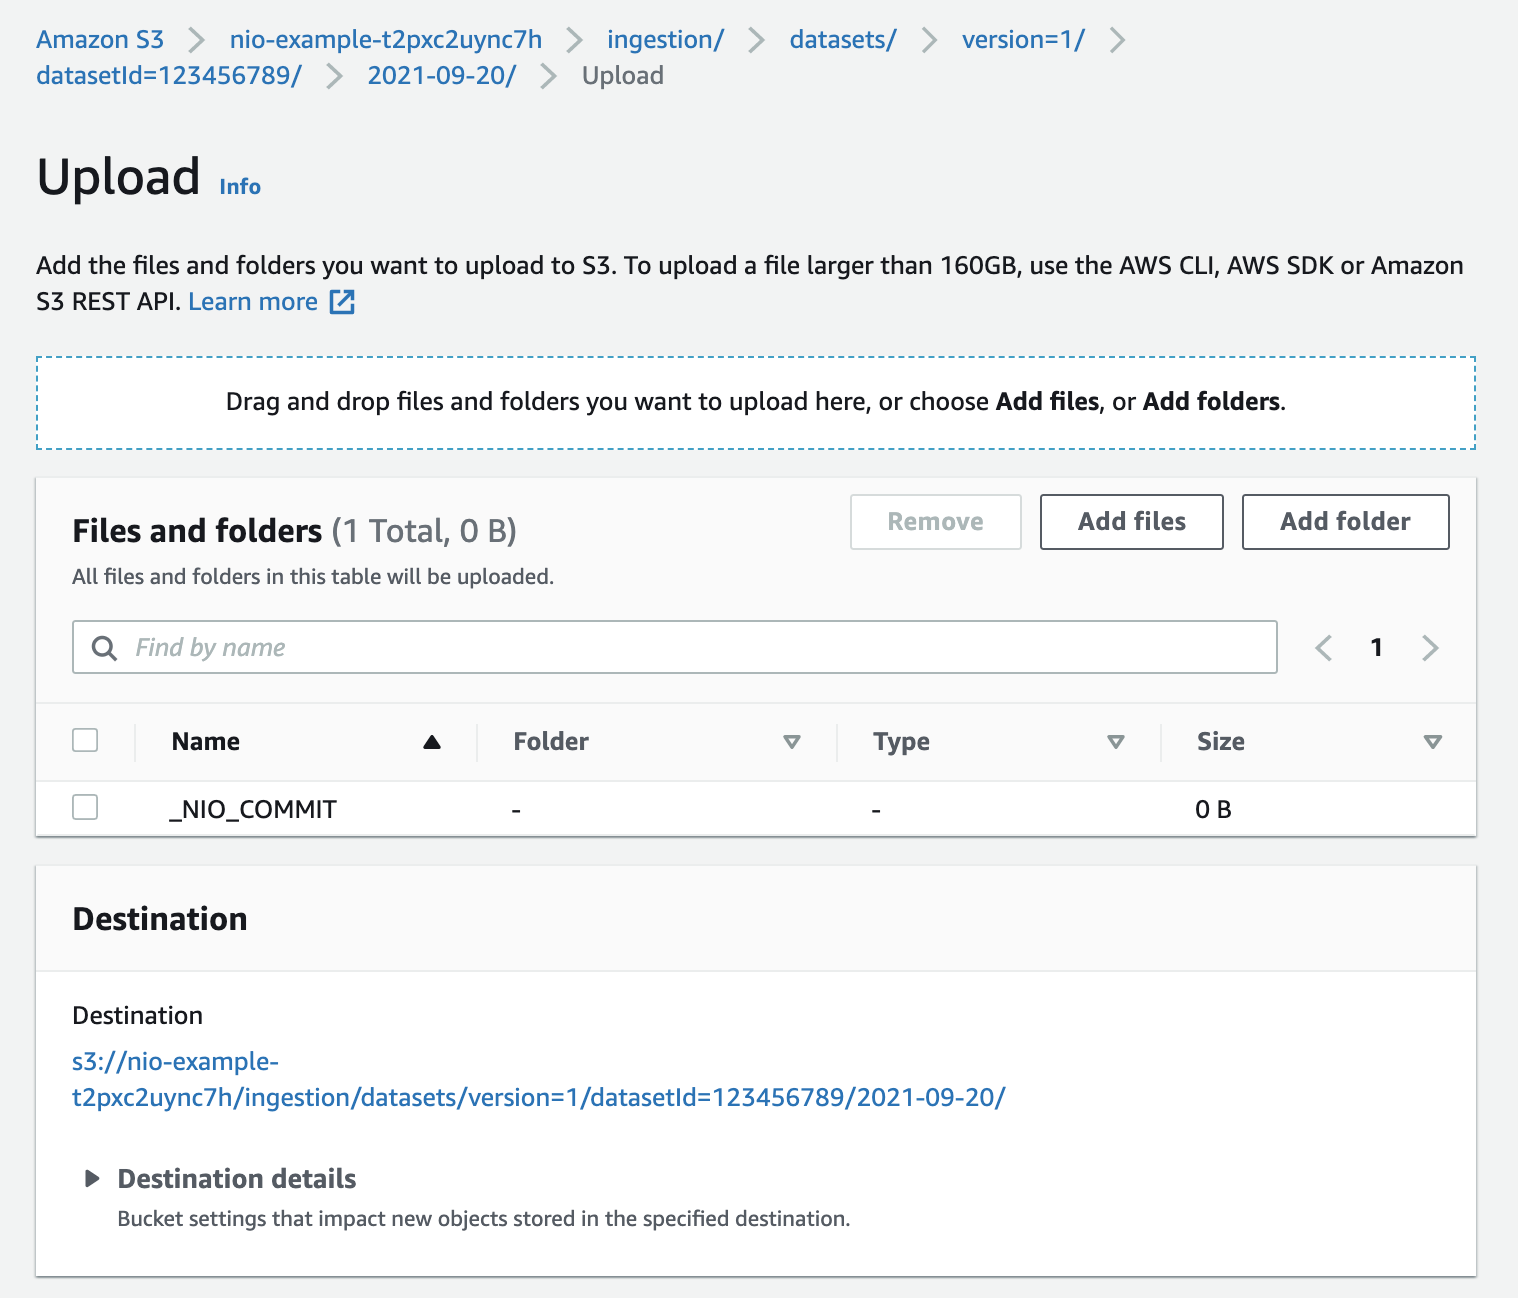
Now that the files to be added to the dataset are in place the next step is to instruct Narrative to the ingest the by writing an ingestion trigger file.
For your convenience you can click here to download an empty file called _NIO_COMMIT.
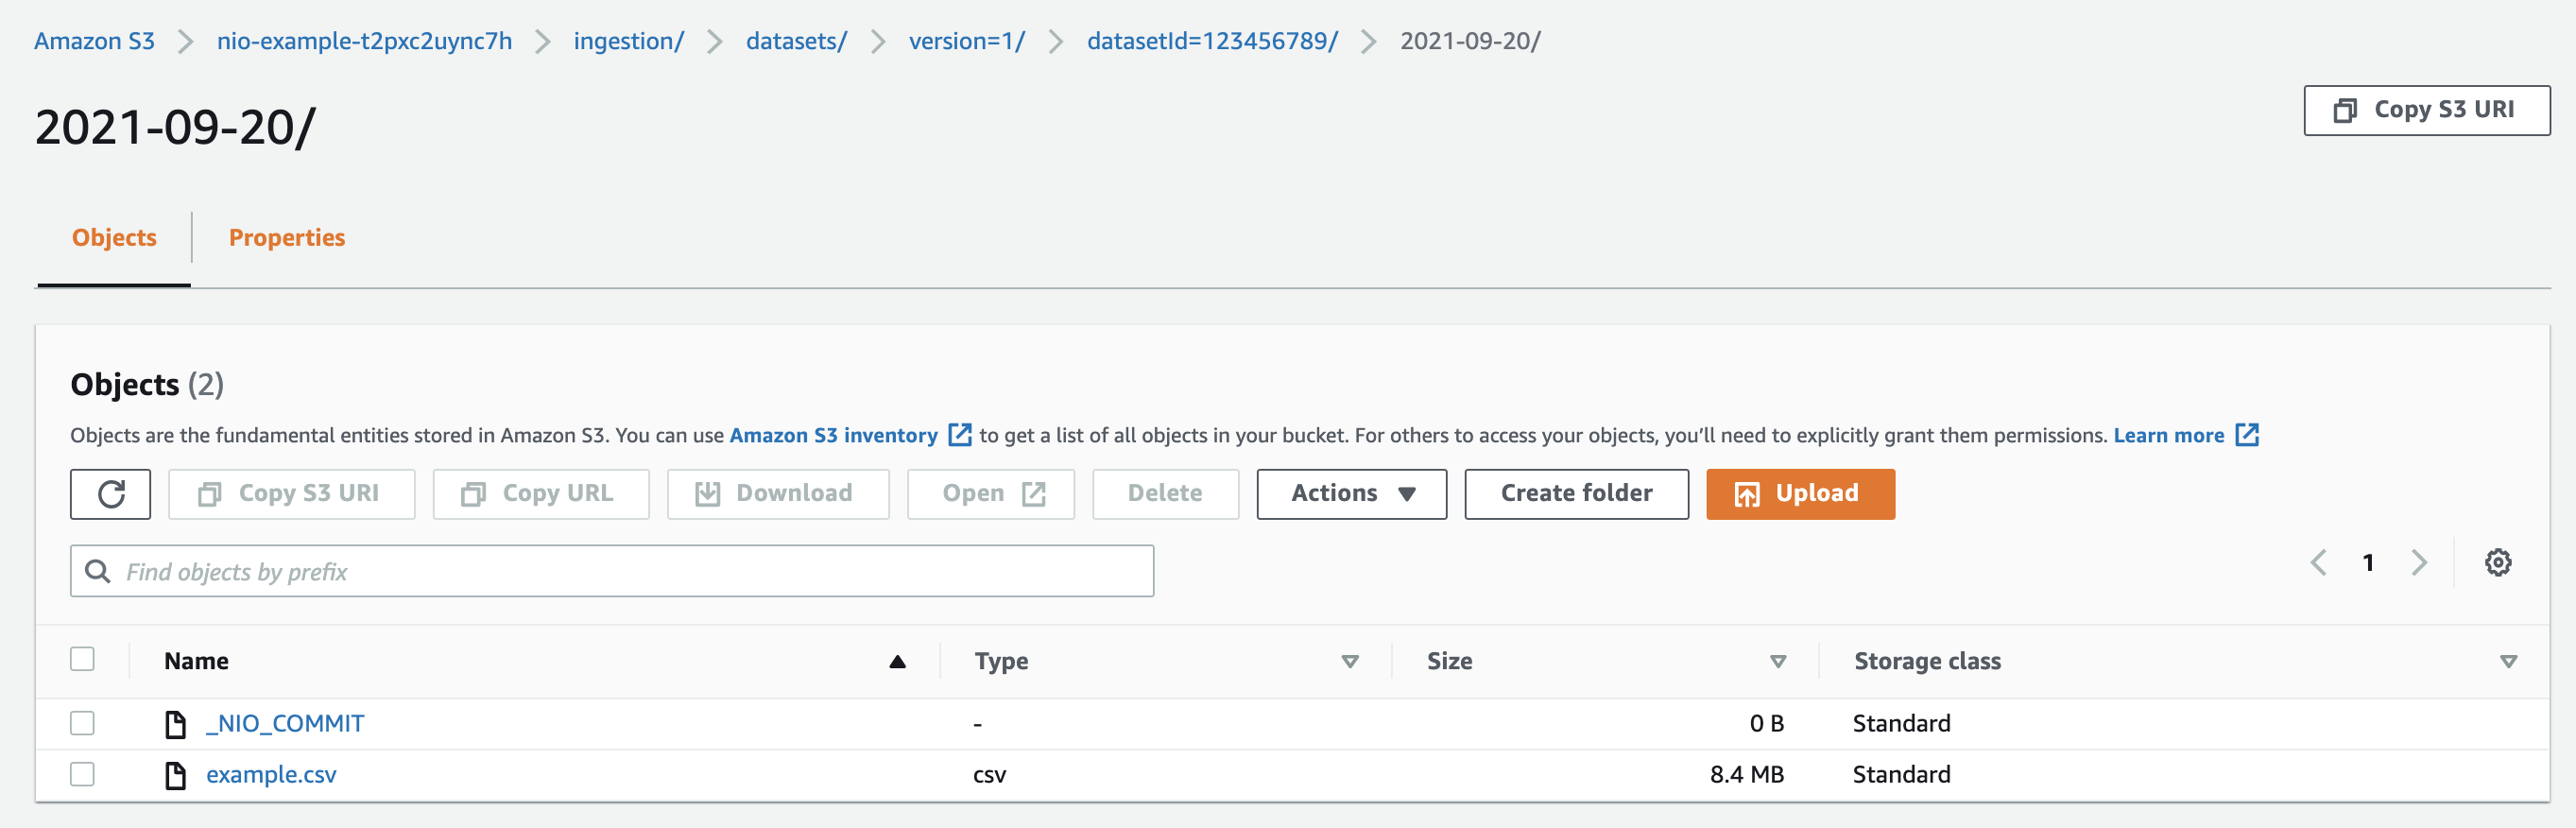
After the previous steps the contents of the folder look like:
Click Upload and then Add Files. Select the _NIO_COMMIT file then scroll to the bottom of the page and click Upload.
The contents of the folder to be ingested will now look like:
Narrative's systems will then ingest example.csv into dataset 123456789.